📦 What this page covers
This quick guide shows how to set up multiple Eudemons (JinClassic) servers on a single Windows VPS.
✅ Requirements (recommended)
- Windows VPS (Windows Server 2008 R2 / 2012+), Administrator access.
- Drive
C:\with at least 20 GB free space.
📥 Downloads
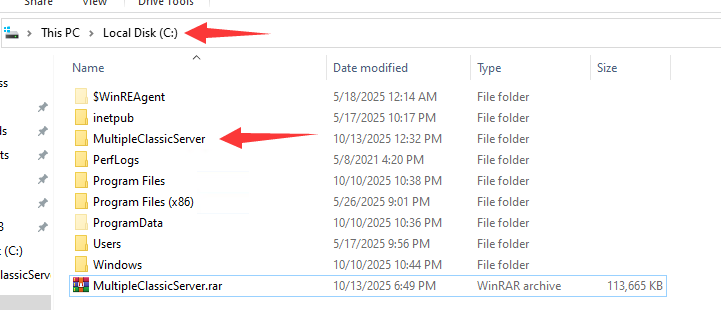
🗂️ Step 1 — Extract the server pack into C:\
- Download MultipleClassicServer.rar to your VPS.
- Right‑click the archive → Extract Here (or extract directly to
C:\). - Check the folder structure looks like this:
Expected path after extraction:
C:\MultipleClassicServer\
├─ AutoPatchJin
├─ Database
├─ JinClassic1
├─ JinClassic2
├─ JinClassic3
├─ JinClassic4
├─ JinClassic5
├─ JinClassic6
├─ JinClassic7
├─ JinClassic8
├─ JinClassic9
├─ JinClassic10
├─ Map File.zip
└─ oem.dat
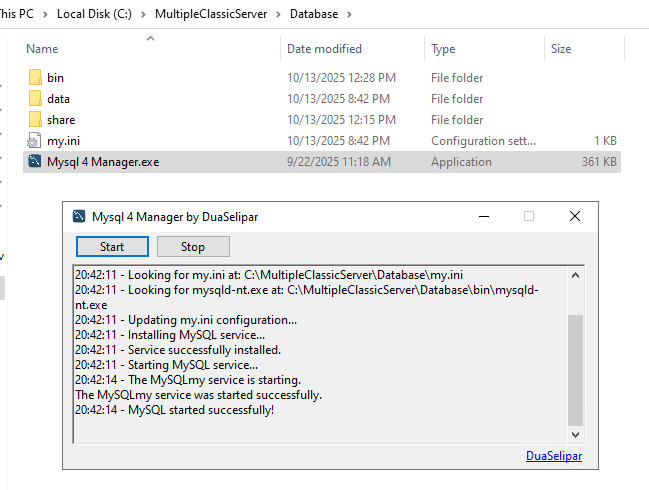
🗄️ Step 2 — Start MySQL 4 Manager and the database
- Go to
C:\MultipleClassicServer\Database\. - Launch
MySQL 4 Manager.exe. - Click
Startto start the MySQL service.
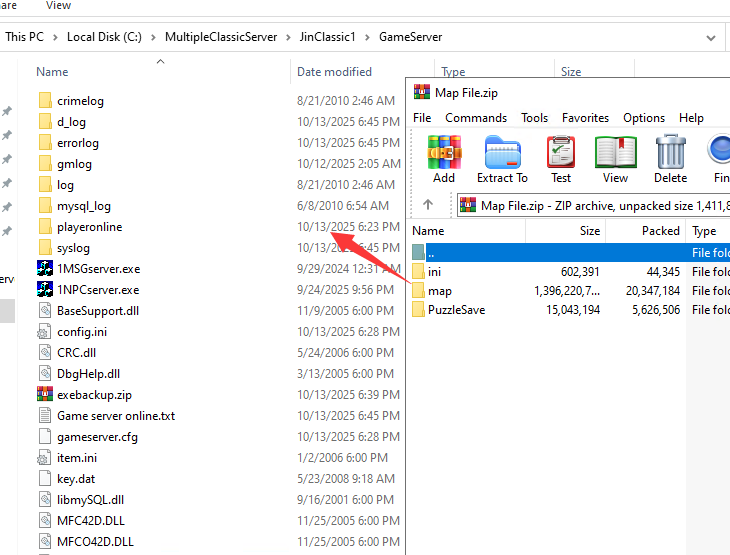
🗺️ Step 3 — Extract the map files
- Open
Map File.zipprovided in the pack. - Extract its contents (
ini,map,PuzzleSave) into everyGameServerfolder. - When prompted, choose Replace/Overwrite.
Target folders:
C:\MultipleClassicServer\JinClassic1\GameServer\
C:\MultipleClassicServer\JinClassic2\GameServer\
C:\MultipleClassicServer\JinClassic3\GameServer\
C:\MultipleClassicServer\JinClassic4\GameServer\
C:\MultipleClassicServer\JinClassic5\GameServer\
C:\MultipleClassicServer\JinClassic6\GameServer\
C:\MultipleClassicServer\JinClassic7\GameServer\
C:\MultipleClassicServer\JinClassic8\GameServer\
C:\MultipleClassicServer\JinClassic9\GameServer\
C:\MultipleClassicServer\JinClassic10\GameServer\
One archive is used for all servers due to storage limits.
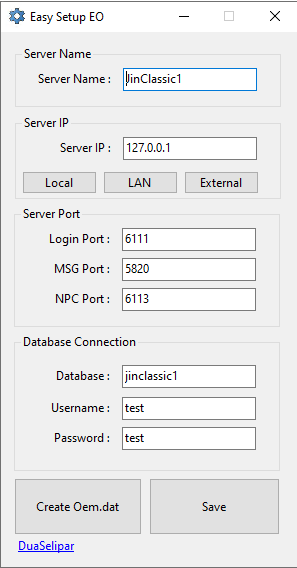
Map File.zip into JinClassic1\GameServer.⚙️ Step 4 — EasySetupEO (per GameServer)
- Open
EasySetupEO.exeinside eachGameServerfolder. - Server Name: set your server name.
- Server IP:
- Local —
127.0.0.1, solo play. - LAN — play within your local network.
- External — play online (public IP/DNS).
- Local —
- Server Port:
- Login Port — you can change this.
- MSG Port — ignore and do not change.
- NPC Port — you can change this.
- Database Connection: ignore if not needed.
- Click Save when finished.
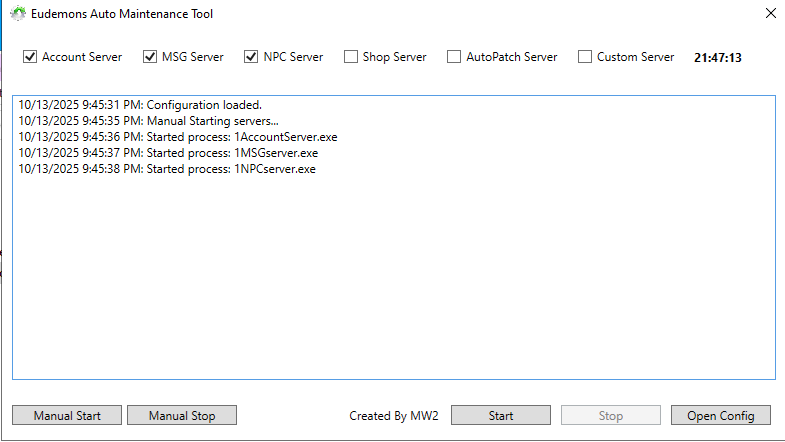
🟢 Step 5 — Start the servers (Auto Maintenance Tool)
- Open AutoMaintTool in each server folder you want to run.
- Click Open Config to select which services to manage, then Save.
- Click Start to begin the auto-maintenance cycle, or use Manual Start/Manual Stop for immediate control. You can create a desktop shortcut for quick access.
🛠️ Step 6 — Edit oem.dat for the client
For a single server, you can use the Create Oem.dat button in EasySetupEO.
For multiple servers, open the pre-made oem.dat included in the pack and edit it manually.
- Open
C:\MultipleClassicServer\oem.datwith Notepad. - For each entry (
Server1/Ip1/ServerName1, etc.), change the server name, IP, and Login Port (the port you set in EasySetupEO). - Save and copy the file to your client:
Client\ini\oem.dat(overwrite).
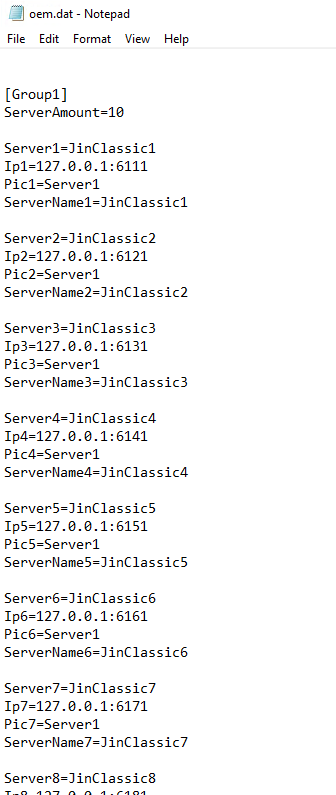
oem.dat with different login ports.
🎮 Step 7 — Happy Gaming!
- Make sure your generated
Oem.datare copied into the client folder (Client\ini\). - Launch the client, pick your server, and log in. Have fun!
Important Warning
Do not rename any files or folders from the server/client pack. Keeping original names ensures this tutorial works correctly.
Antivirus Exclusion & Restore
- Add an antivirus/Defender exclusion for your server folder (e.g.
C:\MultipleClassicServer\) to prevent.exefiles from being removed. - If an executable gets deleted, Look for
exebackup.zip in AccountServer or GameServer, extract it back, and run the server as usual.
⬇️ Other Downloads
- Flash Player Installer — if the game window shows a blank/black screen when opening.
- .NET 8 Runtime / Desktop Runtime x64
- .NET 8 Runtime / Desktop Runtime x32